

Configuring Modals and Alerts using Dynamic Components in Angular


What are Dynamic Components?
Dynamic components are essentially components which you create programmatically at runtime. Example, let's say you want to show an alert or a modal which should only be loaded upon a certain action, for example you have an error and you want to show an overlay on the entire screen or something like that, could be done using dynamic components.
Configuring Modals and Alerts using Dynamic Components
Aim is to build scalable and flexible approach to make use of modals and alerts in our project utilizing Angular's Dynamic Component feature.
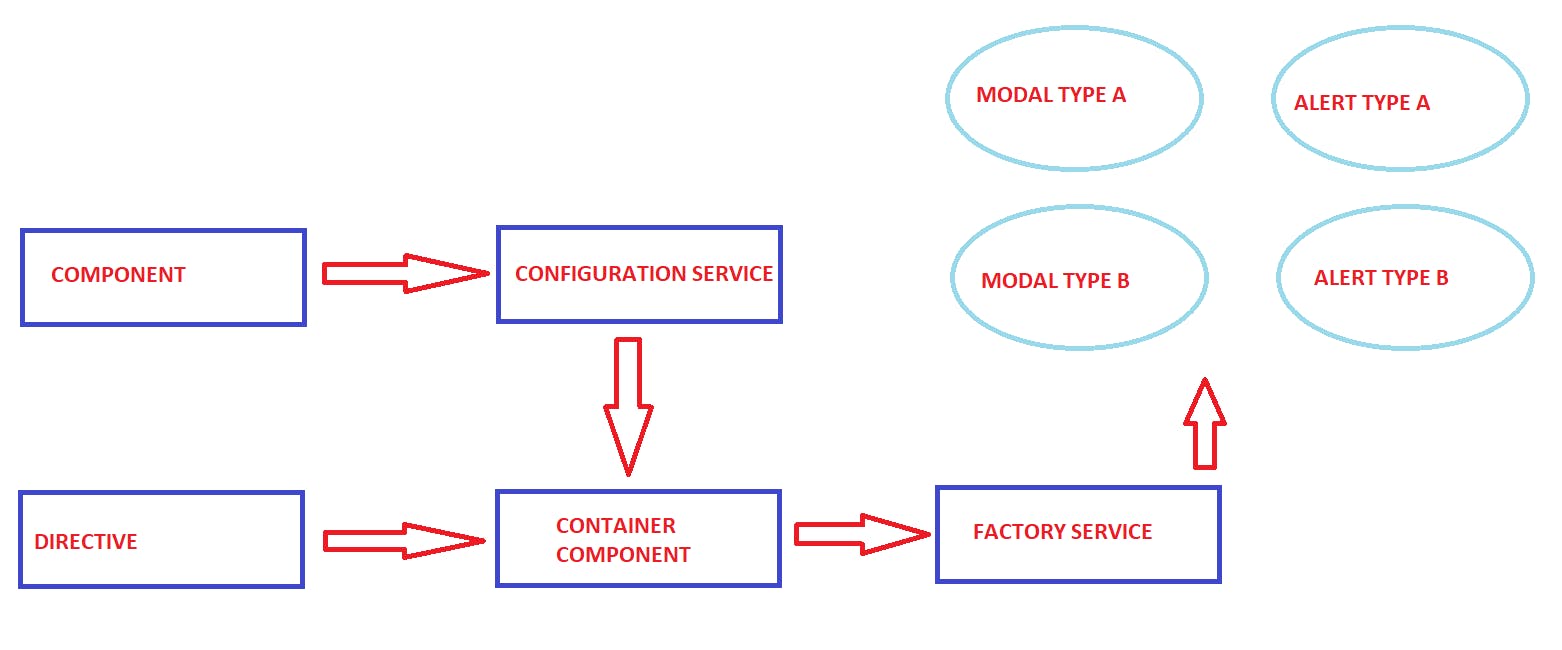
Helicopter view of approach:
- Component that needs to trigger modal or display alert message, prepares a configuration object and dispatches it to configuration service.
- The configuration service is used as a communication service between components and
ComponentFactoryResolver. - The container component acts as a parent component that holds reference to DOM node where modal/alert is to be displayed via
ViewContainerReferenceusing a directive. It invokes factory service, passing the configuration object it received in the process from requesting Component. - The factory service holds the actual logic of creating dynamic components via
ComponentFactoryResolverusing view reference from container component and configuration object from requesting component. - Based on the configuration object, modal / alert is created at runtime and injected in DOM at the specified View.
Here is the mental-model chart of above discussion:
Detailed implementation view
Designing Factory Service
- Factory service holds the core logic for creating Dynamic Components.
- You need to use
ComponentFactoryResolverto create component programmatically and useresolveComponentFactory(<component-name>)method to create desired component.const componentFactory = this.componentFactoryResolver.resolveComponentFactory(dynamicItem.component); const componentRef = vcr.createComponent(componentFactory); (componentRef.instance as DynamicComponent).data = dynamicItem.data; - This method will return a component factory, not the component itself.
- Now with component factory, we can create a concrete component but for this, we also need a place where we can attach it in our DOM.
Note: While designing this topic, I have made use of Angular v12.2 & Angular v13 is just about to release in few days. Since v13, dynamic component creation via
ViewContainerRef.createComponentdoes not require resolving component factory: component class can be used directly.
Designing Container Component
- Now that we have hold of dynamically created component, we just need a place to inject that in our DOM.
- We can think of adding
divwith a local (template) reference along with@ViewChild, we could get access to that but this is not how it works. - Angular needs a
ViewContainerRefwhich is essentially an object managed internally by Angular, which gives Angular a reference/pointer to a place in the DOM with which it can interact We can create a helper directive and now this directive needs to do one important thing, it needs to inject the
ViewContainerRefand this automatically gives you access to the reference/pointer at the place where this directive is then used.import { Directive, ViewContainerRef } from '@angular/core'; @Directive({ selector: '[appDynamicContainerSelector]' }) export class DynamicContainerSelectorDirective { constructor(public viewContainerRef: ViewContainerRef) {} }Note: we need to turn this into a public property, so that we can access that
ViewContainerReffrom outside.- So we get access to that directive we use in the template and we store that in template reference that can be use in our component.
<ng-container appDynamicContainerSelector></ng-container>@ViewChild(DynamicContainerSelectorDirective, { static: true }) containerSelector!: DynamicContainerSelectorDirective; - To create the component, we just invoke configuration service (explained in next section) which passes relevant data to factory service.
this.configService.loadComponent(viewContainerRef, componentconfig); - To destroy component, we clear anything that might have been rendered there before by simply calling clear on this
ViewContainerRef.clear(), it simply clears all Angular components that have been rendered in that place before.
Register Component in app.module
- This is an OPTIONAL section if you're working on Angular v9 and above. For Angular version v8 and below there are certain configuration changes that were necessary while dealing with Dynamic Components .
- Any component as well as directives and pipes you plan on working with, you need to add them to your declarations array, this is important for Angular to understand what's a component or which components and directives and so on you have in your app because it does not automatically scan all your files, you need to tell it which components exist.
- Still, this alone only makes Angular aware of it, so that it is able to create such a component when it finds it in one of two places.
- The first place would be in your templates. If in your templates, let's say, if it find something like
<app-demo>, like this selector, it basically looks into the declarations array, finds it there and then is able to create that component. - The other place where Angular will look for this component is in your route, in your route config when you point at a component there, Angular will also check that in the declarations array and if it finds it there, it is able to create such a component and load it.
- Now one place that does not work by default is when you want to create a component manually in code, which is the exact thing we're trying to do here. Angular does not automatically reach out to the declarations array, you instead deliberately need to inform Angular that in this case, the alert/modal component will need to be created at some place and that Angular basically should be prepared for this.
- Now to tell Angular to be prepared for the creation of that component, you need to add a special property to the object you pass to
NgModule. Besides declarations, imports and so on, there is a propertyentryComponents. Entry components also is an array and it's an array of components types but only of components that will eventually need to be created without a selector or the route config being used.entryComponents: [ModalCompA, AlertCompB] - So whenever a component is created by selector or you use it with the route configuration, you don't need to add it here to entry components. For custom component, it's different and there you simply need to add component to entry components.
Designing Configuration Service
- Configuration Service acts as communication agent between the component that has requested for creating dynamic parts and our Container component using some help from rxjs.
Configuring objects for Dynamic Component
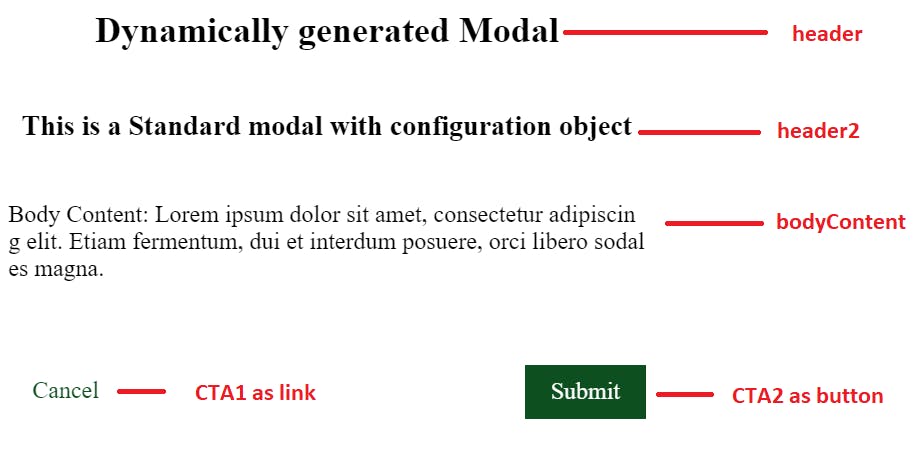
We can create a configuration object to specify items that are to be displayed in our modal e.g. header, body contents, links etc. & then dispatch this object to our container component via configuration service.
const modalData: ComponentConfig = {
    componentType: 'modal',
    dynamicComponentType: StandardModalComponent,
    data: {
      header: 'Dynamically generated Modal',
      header2: 'This is a Standard modal with configuration object',
      alert: {
        icon: 'alert-warning',
        type: 'warning',
        size: 'md'
      },
      modalSize: 'lg',
      bodyContent: 'Body Content: Lorem ipsum dolor sit amet, consectetur adipiscing elit. Etiam fermentum, dui et interdum posuere, orci libero sodales magna.',
      onClose: () => this.dynamicModalAndAlertConfigService.destroyComponent(),
      callsToAction: [{
        label: 'Cancel',
        HtmlElementType: 'a',
        action: () => this.dynamicModalAndAlertConfigService.destroyComponent(),
        linkAlign: 'left'
      }, {
        label: 'Submit',
        HtmlElementType: 'button',
        action: () => this.dynamicModalAndAlertConfigService.destroyComponent(),
        buttonAlign: 'right'
      }]
    }
  };

  this.dynamicModalAndAlertConfigService.dispatchComponent(modalData);
Here is the mapping of above object with final outcome:
Standalone Modal/Alert Components
- In the last, we need to create templates & styles specific to modal design. Example
- A modal that should display just spinner with
Loading Datamessage - A modal that displays headers, links, content (like one shown in image above)
- A modal that should display just spinner with
- These components are supplied as part of configuration object which are then created dynamically.
Reference Items
- LIVE DEMO P.S. it takes couple of minutes to load & run this link
- Stackbliz Link
- GitHub Link
#angular #dynamic-components